Documents\Edbot\javascript
JavaScript is a cross-platform scripting language created by Brendan Eich in 1995. It is an interpreted programming language with object-oriented capabilities. Alongside HTML and CSS, JavaScript is one of the three core technologies of Web content. The code is usually embedded in a Web page to add interactivity and highly responsive interfaces.
|
It is important to note that JavaScript is distinct from Java. The two languages are completely different although some aspects look similar. |
The Edbot Mini JavaScript API is implemented as a JavaScript object. It allows a JavaScript program to control your Edbot Minis.
This guide assumes you are familiar with writing HTML Web pages containing JavaScript code. The API uses jQuery to simplify coding and you should have some familiarity with it: jQuery is a fast and concise JavaScript library created by John Resig in 2006 with the motto, "write less, do more".
Download and install the JavaScript IDE (Integrated Development Environment) of your choice. For Windows choose from a fully integrated package such as Visual Studio or use an advanced text editor like Komodo or Notepad++. Linux (including Raspbian) also has a variety of IDEs available such as Bluefish and Geany.
Make sure you are running the latest version of the Edbot Software available from the download page. For the purposes of this guide we'll assume you've set up your Edbot server and you're running it locally. If the Edbot Software is running remotely, you'll need to change the localhost references to the name of the remote server.
The JavaScript examples folder is part of the Edbot Software installation. In Windows the folder is located in your 'Documents' folder:
Documents\Edbot\javascriptSimilarly for macOS and Linux:
Documents/Edbot/javascriptThe folder should initially contain the following files and folders:
edbot/
  edbot-client.js
  jquery.js
  util.js
base.css
mini_motions.html
mini_toggler.html
monitor.html
The edbot folder contains the EdbotClient class which implements the API. Several examples using the API are included:
mini_motions.html queries the server for Edbot Minis and available motions and enables you to run a motion.
mini_toggler.html selects the first Edbot Mini and enables you to toggle the servo LEDs.
monitor.html displays the Edbot server status in real time.
The style sheet base.css gives the examples a coherent look and feel.
You can save your own code in this folder to make it easy to develop and test.
|
The API makes use of AJAX to send requests to the Edbot server. As a result you must load the HTML sample pages using http. The local file protocol (file:///) will not work due to basic browser security. For this purpose the Edbot Software runs a Web server locally. You can view the sample folder using the following link: If you've changed the server port in the Edbot server setup, substitute your port in the link above. |
The EdbotClient class implements the Edbot Mini API in JavaScript. Make the class available using a <script> tag in the <head> section of your Web page. You'll need to reference jQuery first:
<script src="edbot/jquery.js"></script>
<script src="edbot/edbot-client.js"></script>
<script src="edbot/util.js"></script>
Still in the <head> section, add your code in a <script> tag:
<script>
... your code ...
</script>
Now create an instance of the EdbotClient class. Specify the Edbot server running locally on the default port of 8080. You can use the API to connect to a remote Edbot server too, but we'll stick to a server running locally for this guide.
var ec = new EdbotClient("localhost", 8080);|
Your program should only create one instance of the EdbotClient class. |
Next connect to the Edbot server both to send commands and receive data updates. The data updates can occur at any time after connecting - they are asynchronous. However, JavaScript code runs in a single execution thread, unlike other languages such as Java or Python. This problem is solved with the use of event callbacks: in essence you register a function to be called when a specific event occurs at which point program execution jumps to the function you registered. Execution then returns to the code running before the event occurred. The Edbot Mini JavaScript API uses this technique to handle data updates from the Edbot server.
Register your callbacks as part of the connect method. For more details consult the Reference section.
ec.connect(
  {
    onopen: function(event) {
      // Not a great deal of use.
    },
    oninit: function(event) {
      // Called once when data for each configured robot has been received.
    },
    onmessage: function(event) {
      // Called every time a message is received.
    },
    onclose: function(event) {
      // The connection has been closed.
    }
  }
);
After connecting to the Edbot server, your program will need control of the robot. Grant control using the active user menu in the Edbot Software. See below.
|
If you're developing solo, the Edbot Software provides a convenient per-robot option "Open access" in the Server → Setup → Configure window. This will allow any connection to control the robot. Check this option while developing so that you don't need to give control each time you test your program. To stop other network users inadvertently accessing the robot, uncheck the "Available on network" option. |
When you have successfully connected to the Edbot server you can send commands to your robot. For example to run a "bow 1" motion (with id of 5) on an Edbot Mini called "Bob", use:
ec.runMotion("Bob", 5);You can run built-in motions, control the speed and position of individual servos and even get your Edbot Mini to speak using the API methods detailed in the Reference section.
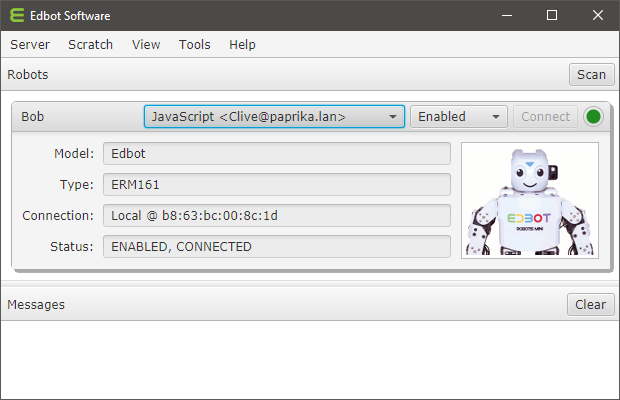
A call to getData() will return real time data as a JSON object. The JSON object gives access to lots of useful information you can use in your code. You can run the Monitor example below to examine the current values. Here's what the values mean:
{
  "server": {                          # server information
      "version": "6.0.0.1661",
      "platform": "Windows 10, 10.0.17134.523, amd64"
  },
  "auth": "9TBvXvf9",                  # private session token
  "initComplete": true,                # true after connect() returns
  "robots": {
    "Bob": {                           # name of the robot
      "enabled": true,                 # enabled?
      "connected": true,               # Bluetooth connected?
      "reporters": {                   (1)
        ...
      },
      "activeUser": "JavaScript...",   # currently active user
      "model": {                       # the robot model
          "name": "Edbot Mini",
          "type": "ERM162",
          "key": "mini"
      }
    }
  },
  "user": "JavaScript <Clive@[192.168.1.24]:51144>",
  "users": [
    "JavaScript <Clive@[192.168.1.24]:51144>",
    "Scratch 2.0 <Clive@[192.168.1.24]:0>",
  ]
}| 1 | The reporter object or null if not connected. |
The reporter properties provide real time data from the robot microcontroller.
The Edbot Mini has 4 sensor ports and the supplied IRSS-10 distance sensor mounted on the head is plugged into port1. Some Minis have been customised with a DMS-80 distance sensor mounted on the chest connected to port2. You can obtain the raw value for a particular port from the following reporter properties:
"reporters": {
  "port1": 10,
  "port2": 350,
  "port3": 580,
  "port4": 22,
  ...
}
Use the rawToIRSS10Dist method to convert the raw value of the IRSS-10 to a distance in centimetres and the rawToDMS80Dist function to convert the raw value of the DMS-80.
|
The sensor data is enabled by default. To receive servo data, you'll need to disable sensor data with a call to setOptions(robot, "sensor_data/0"). In this mode, the sensor reporters will be null. Sensor data is NOT returned whilst a built-in motion is running. |
Each servo has a property name beginning with servo- followed by a zero-padded 2 digit servo id. In default mode the servo data consists of the following properties:
The current position property in degrees to 1 decimal place.
The aligning property is true if the servo is in the process of moving after a call to setServoPosition.
The torque property is set to true if the servo is on. A positive value means CCW rotation and a negative value means CW rotation.
The load property as a percentage to 1 decimal place.
The extended property is set to null.
For example:
"reporters": {
  "servo-01": {
    "position": 150.0,
    "aligning": false,
    "torque": false,
    "load": 0.0,
    "extended": null
  },
  "servo-02": {
    "position": 150.0,
    "aligning": false,
    "torque": false,
    "load": 0.0,
    "extended": null
  },
  ...
}
In extended servo mode, extra information is returned in the extended property:
The speed property as a percentage to 1 decimal place. A positive value means CCW rotation and a negative value means CW rotation.
The voltage property is returned to 1 decimal place. This value can be used to detect low batteries.
The pid property reports the PID gain values as a colon separated list in the format P:I:D.
Here's an example:
"reporters": {
  "servo-01": {
    "position": 150.0,
    "aligning": false,
    "torque": false,
    "extended": {
      "speed": 10.0,
      "voltage": 7.4,
      "pid": "32:0:0"
    }
  },
  "servo-02": {
    "position": 150.0,
    "aligning": false,
    "torque": false,
    "extended": {
      "speed": 10.0,
      "voltage": 7.3,
      "pid": "32:0:0"
    }
  },
  ...
}|
The servo data is disabled by default. In this mode, the servo reporters will be null. To receive servo data, you'll need to disable sensor data with a call to setOptions(robot, "sensor_data/0"). Sensor data is NOT updated whilst a built-in motion is running. |
The speechCurrentWord reporter gives the current word as it is being spoken. The reporter is set to null when not speaking. It can be used to add visual emphasis during speech, such as flashing the servo lights on and off.
"reporters": {
  "speechCurrentWord": "Hello",
  ...
}|
The current word reporter is only available on Windows and Mac platforms. |
Read through the following examples to gain an understanding of how to use the API. The Reference section details the API methods with their parameters and return values.
The final example queries the server and presents the Edbot Minis and motions in dropdown menus. Select a motion and run it! The status of each Edbot Mini is displayed in real time. Here's the basic HTML markup:
<!DOCTYPE html>
<html lang="en">
<head>
<meta charset="utf-8">
<title>Mini Motions</title>
<link rel="stylesheet" href="base.css">
<script src="edbot/jquery.js"></script> (1)
<script src="edbot/edbot-client.js"></script> (2)
<script src="edbot/util.js"></script>
<script>
... (3)
</script>
</head>

<body>
<div class="nohttp">
  <p>You must load this Web page using HTTP.
  Run the Edbot Software and use the following link:
  <p><a href="http://localhost:8080/coding/javascript/mini_motions.html">http://localhost:8080/coding/javascript/mini_motions.html</a>
  <p>If you've changed the server port in the server setup, substitute your port in the link above.
</div>
<div class="container">
  <img id="logo" src="/images/edbot.png">
  <hr>
  <div class="info">
    <p>Run a motion!
    <p>This script uses the Edbot Mini JavaScript API to connect to your Edbot server.
    It displays the Edbot Minis in a menu and dynamically builds a motion menu for the
    selected Edbot Mini.
    <p>To try this example, make sure the Edbot Software is running locally.
    Don't forget to set the "Mini Motions" script as the active connection if necessary.
  </div>
  <table class="motion">
    <tr>
      <td class="label">Edbot Mini:</td>
      <td><select id="edbots_menu"></select></td> (4)
    </tr>
    <tr>
      <td class="label">Motion:</td>
      <td><select id="motions_menu"></select></td> (5)
    </tr>
    <tr>
      <td></td>
      <td><button id="run_button">Run</button></td>
    </tr>
  </table>
  <hr>
  <div class="info">
    <p>Display the current status of each robot in real time.
    <table id="status_table"> (6)
      <tr class="status_header">
        <td class="status_name">Robot</td>
        <td class="status_model">Model</td>
        <td class="status_active_user">Active Connection</td>
        <td class="status_enabled">Enabled</td>
        <td class="status_connected">Connected</td>
      </tr>
    </table>
  </div>
  <textarea id="log" readonly="readonly" placeholder="Log messages..."></textarea>
</div>
</body>
</html>| 1 | The Edbot Mini JavaScript API uses jQuery. This should be included first. |
| 2 | The EdbotClient class implements the Edbot Mini JavaScript API. |
| 3 | We'll add the JavaScript code here. |
| 4 | The edbot menu populated using JavaScript. |
| 5 | The motion menu populated using JavaScript. |
| 6 | This table will display the status of each Edbot Mini. |
The code is listed below with annotations:
var ec = null;
$(document).ready(
  function() {
    // Make sure we are loading the page with http.
    if(!location.protocol.startsWith("http")) {
      $(".nohttp").show();
      return;
    } else {
      $(".container").show();
    }

    // Grab the port from the URL, defaulting to 8080.
    var port = location.port || 8080;

    // Create a new EdbotClient instance and connect.
    ec = new EdbotClient("localhost", port, { client: "Mini Motions" }); (1)
    connect();
  }
);
function connect() {
  var miniMenu = $("#mini_menu");
  var motionMenu = $("#motion_menu");
  var runButton = $("#run_button");
  var statusTable = $("#status_table");

  // Make that connection.
  ec.connect(
    {
      onopen: function(event) {
        log("Connected to Edbot server");
      },
      oninit: function(event) { (2)
        // Get the Edbot Mini names.
        var names = ec.getRobotNames("mini");
        if(names.length > 0) {
          names = names.sort();
          $.each(names,
            function(index, name) {
              // Populate the Edbot Mini menu and select the first.
              miniMenu.append($("<option/>") (3)
                .val(name)
                .text(name)
              ).prop("selectedIndex", 0);

              // Populate the motions based on the selected Edbot Mini.
              miniMenu.change( (4)
                function() {
                  motionMenu.empty();
                  ec.getMotions(miniMenu.val(),
                    function(res) {
                      var motions = res.data.All;
                      $.each(motions,
                        function(index, motion) {
                          motionMenu
                          .append($("<option/>")
                            .val(motion.id)
                            .text(motion.name)
                          );
                        }
                      );
                      motionMenu.val(1);
                    },
                    null
                  );
                }
              ).change();
            }
          );

          // Bind the run button.
          runButton.unbind().click( (5)
            function() {
              var name = miniMenu.val();
              var motionId = motionMenu.val()
              ec.say(name, $("#motion_menu option:selected").text()); (6)
              ec.runMotion(name, motionId, onsent); (7)
            }
          ).attr("disabled", false);
        } else {
          log("No Edbot Minis configured");
          runButton.attr("disabled", true);
        }
      },
      onmessage: function(event) {
        // Update the status table.
        var names = Object.keys(ec.getData().robots).sort(); (8)
        for(var i = 0; i < names.length; i++) {
          var name = names[i];
          var robot = ec.getData().robots[name];

          // Do we have an existing table row for this robot?
          var row = $("#status_table td").filter(
            function() {
              return $(this).text() == name;
            }
          ).closest("tr");
          if(row.length == 0) {
            // Add a new row.
            row = $(".status_header").clone().attr("class", "status_row");
            row.find(".status_name").text(name);
            row.find(".status_model").text(robot.model.name);
            statusTable.append(row);
          }
          row.find(".status_active_user").text(
            robot.activeUser ? robot.activeUser : "Open access"
          );
          row.find(".status_enabled").text(
            robot.enabled ? "True" : "False"
          );
          row.find(".status_connected").text(
            robot.connected ? "True" : "False"
          );
        }
      },
      onclose: function(event) {
        // Reset the controls and attempt to reconnect.
        miniMenu.find("option").remove();
        motionMenu.find("option").remove();
        statusTable.find("tr:gt(0)").remove();
        connect();
      },
      onerror: function(event) {
        log("Failed to connect to Edbot server");
      }
    }
  );
}
function onsent(response) {
  if(!response.status.success) {
    // Log the issue.
    log(response.status.message);
  } else {
    log($("#mini_menu option:selected").text() + " is running motion " +
      $("#motion_menu option:selected").text()
    );
  }
}
function log(str) { (9)
  var now = new Date();
  var date = now.toLocaleDateString();
  var time = now.toLocaleTimeString();
  $("#log").append(date + " " + time + ": " + str + "\n");
  $("#log").scrollTop($("#log")[0].scrollHeight);
}| 1 | Create a new EdbotClient instance and call the connect method. |
| 2 | At this point we can be sure data for each configured Edbot Mini has been received. |
| 3 | Build the minis menu. |
| 4 | Build the motions menu for the selected Edbot Mini. |
| 5 | Bind the run button. |
| 6 | Say the motion name, if speech is configured. |
| 7 | Run that motion! |
| 8 | Display the status of the Edbot Minis in real time. |
| 9 | We'll log messages to a textarea on the page. |
You can try this example by clicking on the link below:
|
If you've changed the server port in the Edbot server setup, substitute your port in the link above. |
The next example demonstrates how to control the servo LEDs. Here's the basic HTML markup:
<html lang="en">
<head>
<meta charset="utf-8">
<title>Edbot LED Toggler</title>
<link rel="stylesheet" href="base.css">
<script src="edbot/jquery.js"></script> (1)
<script src="edbot/edbot-client.js"></script> (2)
<script src="edbot/util.js"></script>
<script>
... (3)
</script>
</head>

<body>
<div class="nohttp">
  <p>You must load this Web page using HTTP.
  Run the Edbot Software and use the following link:
  <p><a href="http://localhost:8080/coding/javascript/mini_toggler.html">http://localhost:8080/coding/javascript/mini_toggler.html</a>
  <p>If you've changed the server port in the server setup, substitute your port in the link above.
</div>
<div class="container">
  <img id="logo" src="/images/edbot.png">
  <hr>
  <div class="info">
    <p>Switch your Edbot Mini servo LEDs on or off.
    <p>This script uses the Edbot Mini JavaScript API to connect to your Edbot server.
    It grabs a sorted list of Edbot Minis and selects the first one.
    <p>To try this example, make sure the Edbot Software is running locally.
    Don't forget to set the "Mini Toggler" script as the active connection if necessary.
    <p>LEDs: <button id="on_button">on</button> <button id="off_button">off</button>
  </div>
  <textarea id="log" readonly="readonly" placeholder="Log messages..."></textarea>
</div>
</body>
</html>| 1 | The jQuery library needs to be included first. |
| 2 | Include the Edbot Mini JavaScript API. |
| 3 | We'll add JavaScript code here to turn the Edbot servo lights on and off. |
The code is listed below with annotations:
var ec = null;
$(document).ready(
  function() {
    // Make sure we are loading the page with http.
    if(!location.protocol.startsWith("http")) {
      $(".nohttp").show();
      return;
    } else {
      $(".container").show();
    }

    // Grab the port from the URL, defaulting to 8080.
    var port = location.port || 8080;

    // Create a new EdbotClient instance and connect.
    ec = new EdbotClient("localhost", port, { client: "Mini Toggler" }); (1)
    connect();
  }
);
function connect() {
  var onButton = $("#on_button");
  var offButton = $("#off_button");
  ec.connect(
    {
      onopen: function(event) {
        log("Connected to Edbot server");
      },
      oninit: function() { (2)
        var names = ec.getRobotNames("mini"); (3)
        if(names.length > 0) {
          names = names.sort();
          name = names[0];
          log("Using first Edbot Mini: " + name);
          onButton.unbind().click(
            function() {
              ec.setServoLED(name, "0/3", onsent, { cmd: "on"}); (4)
            }
          ).attr("disabled", false);
          offButton.unbind().click(
            function() {
              ec.setServoLED(name, "0/0", onsent, { cmd: "off"}); (5)
            }
          ).attr("disabled", false);
        } else {
          log("No Edbot Minis configured");
          onButton.attr("disabled", true);
          offButton.attr("disabled", true);
        }
      },
      onclose: function(event) { (6)
        connect();    // attempt to reconnect
      },
      onerror: function(event) {
        log("Failed to connect to Edbot server");
      }
    }
  );
}
function onsent(response, osd) { (7)
  if(!response.status.success) {
    log(response.status.message);
  } else {
    log("Turning LEDs " + osd.cmd);
  }
}
function log(str) { (8)
  var now = new Date();
  var date = now.toLocaleDateString();
  var time = now.toLocaleTimeString();
  $("#log").append(date + " " + time + ": " + str + "\n");
  $("#log").scrollTop($("#log")[0].scrollHeight);
}| 1 | Create a new EdbotClient instance and call the connect method. |
| 2 | At this point we can be sure data for each configured Edbot has been received. |
| 3 | Retrieve the available Edbot names, sort them and choose the first one. |
| 4 | When the "on" button is pressed, set all LEDs to colour index 3. |
| 5 | When the "off" button is pressed, turn the LEDs off. |
| 6 | Handle closed connections gracefully. |
| 7 | This callback is triggered when the request has been sent to the Edbot server. |
| 8 | We'll log messages to a textarea on the page. |
You can try this example by clicking on the link below:
|
If you've changed the server port in the Edbot server setup, substitute your port in the link above. |
We'll begin by stepping through the monitor example.
<html lang="en">
<head>
<meta charset="utf-8">
<title>Edbot Server Monitor</title>
<link rel="stylesheet" href="base.css">
<script src="edbot/jquery.js"></script> (1)
<script src="edbot/edbot-client.js"></script> (2)
<script src="edbot/util.js"></script>
<script>
var ec = null;
$(document).ready(
  function() {
    // Make sure we are loading the page with http.
    if(!location.protocol.startsWith("http")) {
      $(".nohttp").show();
      return;
    } else {
      $(".container").show();
    }

    // Examine the page URL for host and port parameters.
    var url = new URL(window.location.href);
    var host, port;
    try {
      host = url.searchParams.get("host");
      if(host != null) {
        host = host.trim();
      }
      if(host == null || host.length < 1) {
        host = "localhost";
      }
      port = parseInt(url.searchParams.get("port"));
      if(isNaN(port) || port < 1023 || port > 65535) {
        port = 8080;
      }
    } catch(err) {}
    $("#header").append(" " + host + ":" + port);
    $("title").append(" " + host + ":" + port);

    // Create a new EdbotClient instance and connect.
    ec = new EdbotClient(host, port, { client: "Monitor" }); (3)
    connect();
  }
);
function connect() {
  ec.connect( (4)
    {
      onmessage: function(event) { (5)
        var data = ec.getData();
        var robots = data.robots;
        for(var name in robots) {
          // Sort reporters by key.
          if(robots[name].reporters) {
            var reporters = {};
            Object.keys(robots[name].reporters).sort().forEach(
              function(key) {
                reporters[key] = robots[name].reporters[key];
              }
            );
            robots[name].reporters = reporters;
          }
        }

        // Update the textarea.
        $("#reporter").val(JSON.stringify(data, null, 4));
      },
      onclose: function(event) { (6)
        // Server connection has gone away - clean up.
        $("#reporter").val("");
        connect();    // attempt to reconnect
      }
    }
  );
}
</script>
</head>

<body>
<div class="nohttp">
  <p>You must load this Web page using HTTP.
  Run the Edbot Software and use the following link:
  <p><a href="http://localhost:8080/coding/javascript/monitor.html">http://localhost:8080/coding/javascript/monitor.html</a>
  <p>If you've changed the server port in the server setup, substitute your port in the link above.
</div>
<div class="container">
  <p id="header">Monitoring Edbot server on </p>
  <textarea id="reporter" readonly="true"></textarea>
</div>
</body>
</html>| 1 | The Edbot Mini JavaScript API uses jQuery. This should be included first. |
| 2 | Include the Edbot Mini JavaScript API. |
| 3 | Create a new EdbotClient instance. |
| 4 | Call the EdbotClient connect method to connect to the Edbot server. |
| 5 | Handle received messsages. |
| 6 | Register an onclose callback to handle a closed connection. |
You can try this example by clicking on the link below:
|
If you've changed the server port in the Edbot server setup, substitute your port in the link above. |
The EdbotClient class encapsulates the Edbot Mini JavaScript API.
Create a new instance by calling the constructor and assigning it to a variable.
new edbot.EdbotClient(server, port[, options])Parameters:
server |
string |
The ip address or hostname of the Edbot server. |
||||||
port |
integer |
The port number on which the server is running. |
||||||
options |
object |
Optional properties:
|
Returns:
A new EdbotClient instance. |
Open a connection to the Edbot server.
connect([options])Parameters:
options |
object |
Optional properties:
|
Check if this client instance is connected to the Edbot server.
getConnected()Returns:
true if connected, otherwise false. |
Close the connection to the Edbot server. This functon will initiate an orderly disconnection.
disconnect()Get an unsorted array containing the names of the robots on this server.
getRobotNames([model])Parameters:
model |
string |
Optionally pass in the model key to filter a specific type of robot. Currently defined keys are "mini", "dream" and "play". |
Returns:
The robot names as an array of strings. |
Return the named robot as an object.
getRobot(name)Parameters:
name |
string |
The name of the robot. |
Returns:
An object with the following properties:
model |
object |
An object containing the robot model name, type and key. |
enabled |
boolean |
true if the robot is enabled. |
connected |
boolean |
true if the robot is connected via Bluetooth. |
activeUser |
string |
The currently active user. null means open access. |
reporters |
object |
An object containing the reporters or null if not connected via Bluetooth. |
Get an object containing the Edbot server data.
getData()Returns:
An object with the following properties:
robots |
dict |
The robots configured on the server. Each robot is keyed on name and its value is a robot object. |
initComplete |
boolean |
If true the connection has finished initialising. |
server |
object |
An object containing the server version and platform. |
auth |
string |
A unique token allocated by the server used to identify this session. |
user |
string |
The current user connection. |
users |
array |
An Array of users connected to the server. |
Does this connection have control of the robot?
isActive(name)Parameters:
name |
string |
The name of the robot. |
Returns:
Returns true if the current user is active, otherwise false. |
|
You can retrieve the name of the currently active user using: |
Get the motions for the given robot.
getMotions(name[, cb][, cbd])Parameters:
name |
string |
The name of the robot. |
||||||
cb |
function |
Callback fired when the response is returned. The callback should be of the form: The res object contains the following properties:
|
||||||
cbd |
object |
User data passed to the response callback above. |
Motions are categorised and a specific motion can appear in more than one category. The motion category "All" will always be returned first. This example shows the first two categories to illustrate the returned data structure.
{
  "All": [
    { "id": 24, "name": "backward roll" },
    { "id": 5,  "name": "bow 1" },
    { "id": 6,  "name": "bow 2" },
    { "id": 40, "name": "break dance" },
    { "id": 41, "name": "break dance flip" },
    { "id": 3,  "name": "crouch" },
    { "id": 21, "name": "forward roll" },
    { "id": 42, "name": "gangnam" },
    { "id": 2,  "name": "get up" },
    { "id": 34, "name": "goalie block" },
    { "id": 35, "name": "goalie left" },
    { "id": 36, "name": "goalie right" },
    { "id": 37, "name": "goalie spread" },
    { "id": 38, "name": "head stand" },
    { "id": 1,  "name": "initial position" },
    { "id": 25, "name": "karate left 1" },
    { "id": 27, "name": "karate left 2" },
    { "id": 26, "name": "karate right 1" },
    { "id": 28, "name": "karate right 2" },
    { "id": 11, "name": "left hook" },
    { "id": 10, "name": "left jab" },
    { "id": 30, "name": "left kick" },
    { "id": 32, "name": "left side kick" },
    { "id": 12, "name": "left uppercut" },
    { "id": 14, "name": "left wave" },
    { "id": 29, "name": "push" },
    { "id": 23, "name": "push up" },
    { "id": 8,  "name": "right hook" },
    { "id": 7,  "name": "right jab" },
    { "id": 31, "name": "right kick" },
    { "id": 33, "name": "right side kick" },
    { "id": 9,  "name": "right uppercut" },
    { "id": 13, "name": "right wave" },
    { "id": 39, "name": "run forwards" },
    { "id": 18, "name": "sidestep left" },
    { "id": 17, "name": "sidestep right" },
    { "id": 22, "name": "sit up" },
    { "id": 4,  "name": "stand" },
    { "id": 16, "name": "turn left" },
    { "id": 15, "name": "turn right" },
    { "id": 20, "name": "walk backwards" },
    { "id": 19, "name": "walk forwards" }
  ],
  "Gym": [
    { "id": 24, "name": "backward roll" },
    { "id": 21, "name": "forward roll" },
    { "id": 38, "name": "head stand" },
    { "id": 23, "name": "push up" },
    { "id": 22, "name": "sit up" }
  ],
  ...
}Get the default motions for the given robot model.
getDefaultMotions(model[, cb][, cbd])Parameters:
model |
string |
Model key. Currently defined keys are "mini", "dream" and "play". |
||||||
cb |
function |
Callback fired when the response is returned. The callback should be of the form: The res object contains the following properties:
|
||||||
cbd |
object |
User data passed to the response callback above. |
Switch servos on or off.
setServoTorque(name, path[, cb][, cbd])Parameters:
name |
string |
The name of the robot. |
|||
path |
string |
A string formed by the servo number followed by "/" followed by 0 or 1 to turn the servo off or on respectively. Specify multiple servos by repeating the sequence, for example "1/0/2/0/3/1/4/1". Servo number 0 means all servos, so "0/0" will turn all servos off. |
|||
cb |
function |
Callback fired when the response is returned. The callback should be of the form: The res object contains the following properties:
|
|||
cbd |
object |
User data passed to the response callback above. |
Set the servo speed.
|
This function simultaneously sets the servo torque on to work around a firmware bug. |
setServoSpeed(name, path[, cb][, cbd])Parameters:
name |
string |
The name of the robot. |
|||
path |
string |
A string formed by the servo number followed by "/" followed by the speed expressed as a percentage greater than zero. Specify multiple servos by repeating the sequence, for example "1/50/2/50/3/50/4/50". Servo number 0 means all servos, so "0/12.5" will set all servos to one eighth speed. |
|||
cb |
function |
Callback fired when the response is returned. The callback should be of the form: The res object contains the following properties:
|
|||
cbd |
object |
User data passed to the response callback above. |
Set the servo position.
setServoPosition(name, path[, cb][, cbd])Parameters:
name |
string |
The name of the robot. |
|||
path |
string |
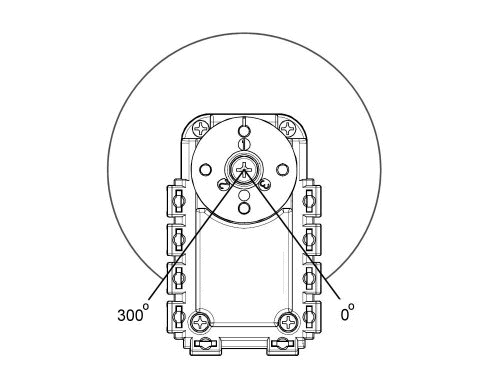
A string formed by the servo number followed by "/" followed by the position which is an angle from 0 to 300 degrees.
Specify multiple servos by repeating the sequence, for example "1/250/2/50". |
|||
cb |
function |
Callback fired when the response is returned. The callback should be of the form: The res object contains the following properties:
|
|||
cbd |
object |
User data passed to the response callback above. |
Set the colours of the servo LEDs.
setServoLED(name, path[, cb][, cbd])Parameters:
name |
string |
The name of the robot. |
|||
path |
string |
A string formed by the servo number followed by "/" followed by the servo colour index. Specify multiple servos by repeating the sequence, for example "1/3/2/3/3/3/4/3". Servo number 0 means all servos, so "0/3" will set all servo LEDs to colour index 3. |
|||
cb |
function |
Callback fired when the response is returned. The callback should be of the form: The res object contains the following properties:
|
|||
cbd |
object |
User data passed to the response callback above. |
The colour index value maps to a colour according to the following table:
0 |
Off |
- |
1 |
Red |
|
2 |
Green |
|
3 |
Yellow |
|
4 |
Blue |
|
5 |
Magenta |
|
6 |
Cyan |
|
7 |
White |
Set the servo PID gain values. Edbot Mini uses state-of-the-art Robotis XL-320 servos. These advanced servos feature PID controllers. A PID controller continuously calculates an error value as the difference between the goal position and the current position. It applies a correction based on proportional (P), integral (I), and derivative (D) terms which gives this type of controller its name. The proportional term is the easiest to understand: The servo applies an electrical current proportional to the error. The integral term increases in relation to the time the error has been present, as well as the size. The derivate term applies to the rate of change of error. For more information on PID controllers consult Wikipedia.
All 3 values should be between 0 and 254, the default PID is {32, 0, 0}.
setServoPID(name, path[, cb][, cbd])Parameters:
name |
string |
The name of the robot. |
|||
path |
string |
A string formed by the servo number followed by "/", then three values each separated by "/" representing the required P gain, I gain and D gain values. Specify multiple servos by repeating the sequence, for example "1/32/0/0/2/32/0/0". |
|||
cb |
function |
Callback fired when the response is returned. The callback should be of the form: The res object contains the following properties:
|
|||
cbd |
object |
User data passed to the response callback above. |
This advanced method allows you to set a value in the microcontroller's control table.
setCustom(name, path[, cb][, cbd])A description of the control table can be found at the following link:
|
As an example you can use this method to turn on the green LED on the controller using a path of "79/1/1". |
Parameters:
name |
string |
The name of the robot. |
|||
path |
string |
A string formed by the control table address (0 - 65535) followed by a "/" followed by the size in bytes (1 or 2) followed by "/" followed by the option value to write (0 - 255 if 1 byte : 0 - 65535 if 2 bytes). |
|||
cb |
function |
Callback fired when the response is returned. The callback should be of the form: The res object contains the following properties:
|
|||
cbd |
object |
User data passed to the response callback above. |
Set global options. These options are set to defaults when the robot is reset either by an explicit call to reset, or when the active user is changed on the Edbot server.
setOptions(name, path[, cb][, cbd])Parameters:
name |
string |
The name of the robot. |
|||||||||
path |
string |
A string formed by the option name followed by "/" followed by the option value. Specify multiple options by repeating the sequence. Edbot Mini currently supports the following options:
|
|||||||||
cb |
function |
Callback fired when the response is returned. The callback should be of the form: The res object contains the following properties:
|
|||||||||
cbd |
object |
User data passed to the response callback above. |
Run the motion referenced by the passed in motion id, starting from 1.
You can also use this method to issue special commands whilst a motion is running. Running motion 0 will stop the currently executing motion in its tracks. Motion -1 will instruct the current motion to run its exit unit, then stop. For more information on this advanced usage, see Motion index numbers.
runMotion(name, motionId[, cb][, cbd])Parameters:
name |
string |
The name of the robot. |
|||
motionId |
integer |
The motion number. |
|||
cb |
function |
Callback fired when the response is returned. The callback should be of the form: The res object contains the following properties:
|
|||
cbd |
object |
User data passed to the response callback above. |
Returns:
The motion sequence string. |
Before the motion is run:
Servo LEDs are switched off - if the motion_leds option is set to the default on.
Servo speeds are reset to 100%.
When the motion completes:
Servo LEDs are switched off - if the motion_leds option is set to the default on.
Servo PID controller values are reset to {32, 0, 0}.
Servos remain switched on.
Specify text for the robot to speak. This method assumes the robot has been configured with speech on the Edbot server. Unicode escapes are fully supported.
say(name, text[, cb][, cbd])Parameters:
name |
string |
The name of the robot. |
|||
text |
string |
The text to speak. |
|||
cb |
function |
Callback fired when the response is returned. The callback should be of the form: The res object contains the following properties:
|
|||
cbd |
object |
User data passed to the response callback above. |
Returns:
The speech sequence string. |
Reset the Edbot Mini. This will stop any current speech, stop any current motion, switch off the servo LEDs, set defaults and empty the request queue.
|
The servo speed settings are not reset due to limitatons in the firmware. |
reset(name[, cb][, cbd])Parameters:
name |
string |
The name of the robot. |
|||
cb |
function |
Callback fired when the response is returned. The callback should be of the form: The res object contains the following properties:
|
|||
cbd |
object |
User data passed to the response callback above. |
Convert the raw value from the IRSS-10 IR sensor to centimetres. The measuring range is 3cm to 30cm.
edbot.rawToIRSS10Dist(raw)Parameters:
raw |
integer |
The raw sensor reading in the range 0 - 1023. |
Returns:
Distance in centimetres rounded to 1 decimal place. |
The method returns 100.0 if the raw value is 0 (out of range).
The sensor was calibrated using the distance between the front edge of the feet and a vertical white A4 card. The card was held a known distance from the sensor and the raw sensor value was noted. This was repeated for different distances. A non-linear power curve was then used to fit the data points. Note the sensor readings will differ for different coloured objects placed the same distance away.
Convert the raw value from the DMS-80 IR sensor to centimetres. The measuring range is 8cm to 80cm.
edbot.rawToDMS80Dist(raw)Parameters:
raw |
integer |
The raw sensor reading in the range 0 - 1023. |
Returns:
Distance in centimetres rounded to 1 decimal place. |
The function returns 100.0 if the raw value is 0 (out of range).
The sensor was calibrated using the distance between the front edge of the feet and a vertical white A4 card. The card was held a known distance from the sensor and the raw sensor value was noted. This was repeated for different distances. A non-linear power curve was then used to fit the data points.