


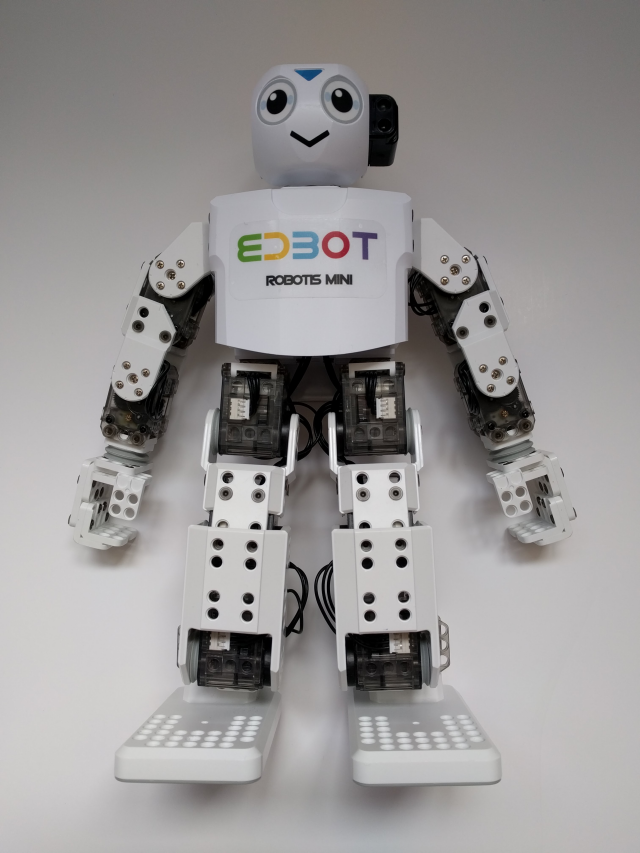
Your Edbot Mini is a humanoid robot that can be programmed to perform all kinds of fun and interesting actions, like dancing, football and gym moves.
This powerful and sophisticated robot is designed to help teach programming skills in an entertaining and interactive way. Whether you use block languages like Scratch or text-based languages such as Python, Edbot Mini brings computational thinking to life, and enlivens any classroom or code club.
|
Before starting please read the safety precautions. |
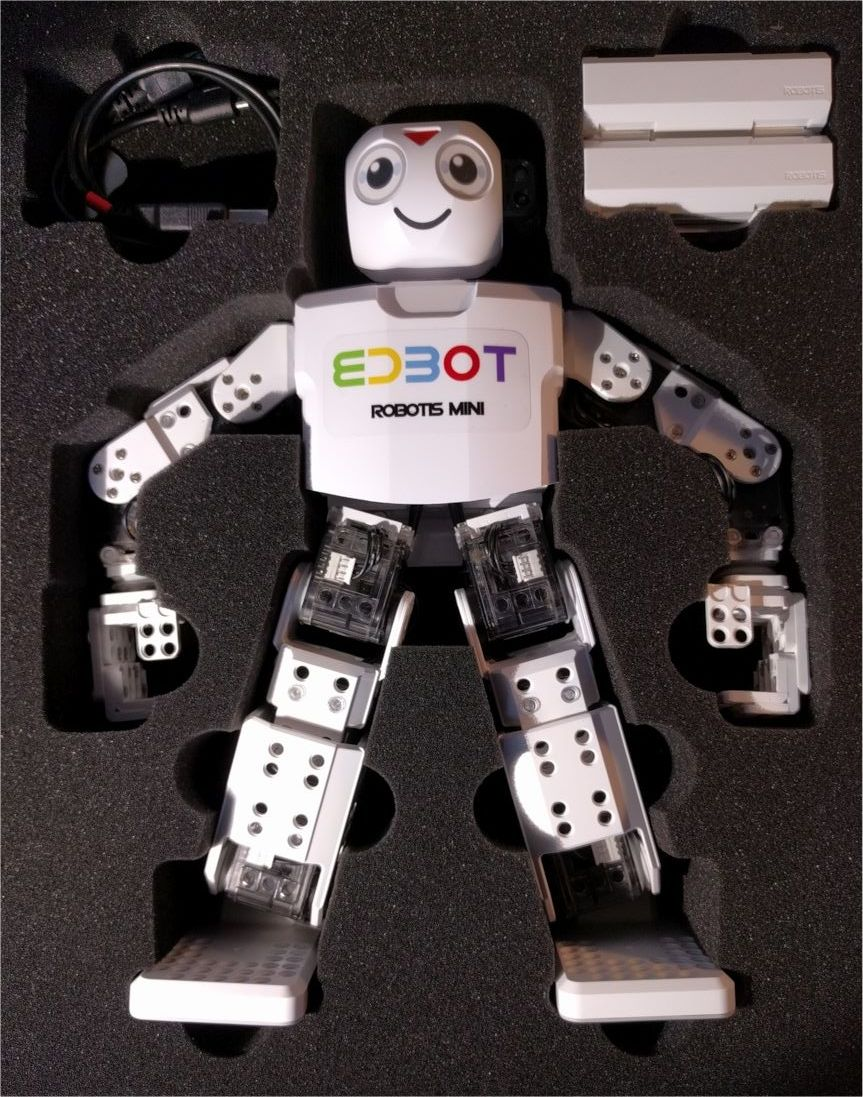
The Edbot Mini case has three compartments containing:
Your Edbot Mini.
A locking key and USB charging cable.
A battery charging cradle with spare batteries.
Your Edbot Mini is a complex device, handle it with care. It includes:
An OpenCM 9.04 microcontroller.
A BT-210 Bluetooth module.
An IRSS-10 infrared distance sensor.
16 XL-320 servo motors.
It is supplied with two removable, rechargeable batteries inserted.
The Edbot Mini case can be locked with this key to ensure your Edbot Mini is safe and secure during storage.
A USB to micro USB x 2 splitter cable that connects the charging cradle to a USB charger (not included).
Your Edbot Mini is supplied with two spare rechargeable batteries inserted into the charging cradle.
Carefully take your Edbot Mini out of its case by gripping the main body under the arms and gently easing the limbs out of the foam cut-out. Charge the batteries to full capacity before use. For further information see the next section.
Each battery has the following properties:
Type: Lithium-ion (Li-ion)
Weight: 50g
Dimensions: 24 x 70 x 27mm
Voltage: 3.7V
Capacity: 1300mAh
A protection circuit module (PCM) is incorporated to protect the battery from overcharge, discharge and excessive current.
Your Edbot Mini is supplied with two removable, rechargeable batteries: one inserted at the back of your Edbot Mini and one inserted under the chest plate at the front.
|
Make sure your Edbot Mini is switched off before removing or fitting the batteries. |
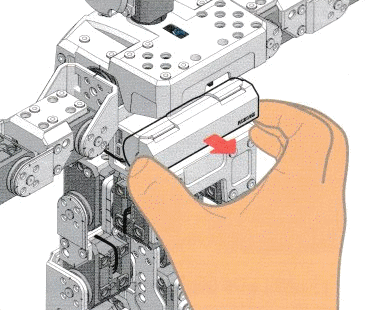
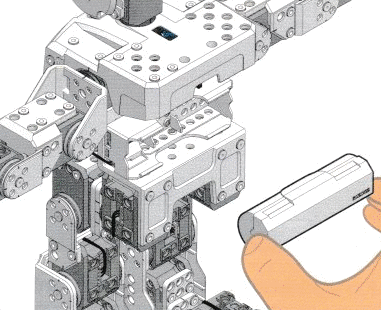
To remove the back battery, grip both ends of the battery and pull the battery, keeping the battery parallel to the holder.
|
|
|
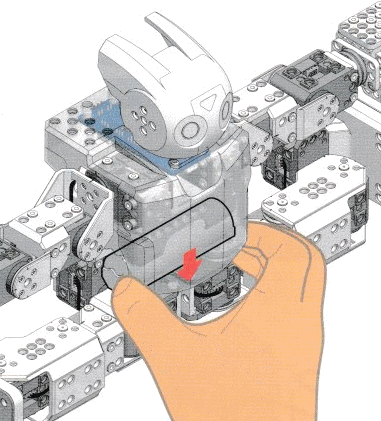
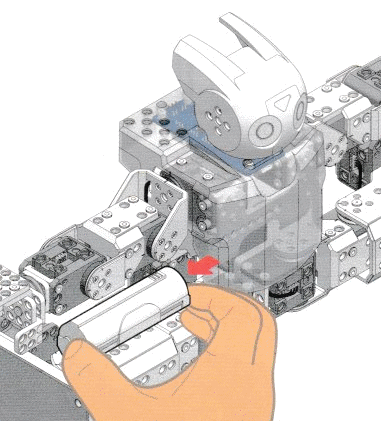
To remove the front battery first splay both legs 90°. This moves the hip servo motors creating the space to slide the battery out. Grip both ends of the battery and pull the battery downwards, keeping the battery parallel to the holder. Then slide the battery out to one side under the chest plate.
|
|
|
To fit the batteries to your Edbot Mini follow the removing instructions detailed above, ensuring you line up the battery contacts with the battery holder connectors and push the battery into the holder until you hear it click.
The battery charging cradle is comprised of two separate chargers each with its own micro USB socket and adjacent charging LED. You can charge up to two batteries at once with the charging cradle.
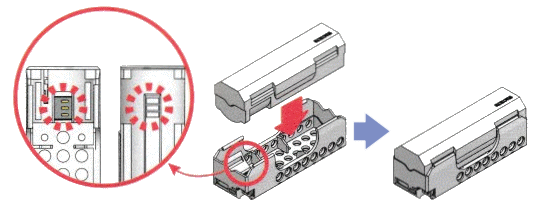
Line up the metal connectors on the battery with the contacts in the charging cradle. Keep the battery parallel to the charging cradle and push the battery into the cradle until you hear it click. |
|
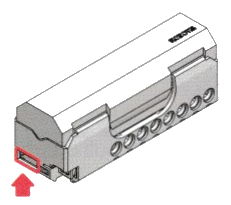
Connect the charging cable to the cradle by fitting the two micro USB plugs into the two corresponding sockets on the cradle. |
|
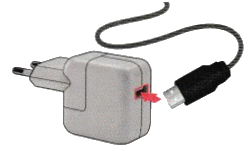
Connect the plug on the other end of the charging cable to a USB charger (not supplied). |
|
Battery charging is indicated by a steady red light on the charging LED. The LED will extinguish when the battery is fully charged. |
|
We recommend using a USB charger that can deliver at least 2.5A at 5V to give a charging time between 2 and 3 hours.
|
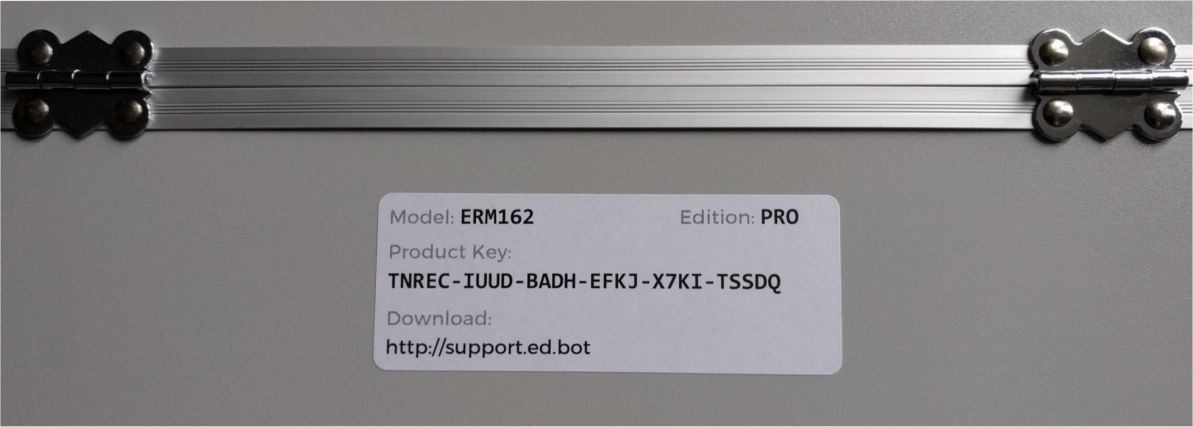
The newer ERM162 Edbot Mini model allows you to charge the batteries in situ. Please note you won't be able to use the Edbot Mini while charging the batteries in this way. Switch off your Edbot Mini before continuing. Connect the charging cable to the micro USB sockets on the battery holders. You will need to carefully raise the left arm to gain access to the front battery. Connect the other end of the charging cable to a USB charger. The batteries will be automatically disconnected from your Edbot Mini whilst they are being charged. |
Download and set up the Edbot Software. You'll find the product key printed on a label attached to the outside of the Edbot Mini case.
Lay your Edbot Mini down on a clear, flat surface with a minimum size of 2m². Your Edbot Mini needs a relatively smooth surface with some friction to operate. A wooden or melamine desk or vinyl floor is ideal. It doesn't like rubber surfaces or carpets - and no it isn't a Dalek! Ensure your Edbot Mini is in the starting position. See below.
|
Make sure the shoulder servo motors are not over-rotated 360°: the cables connecting the shoulder servo motors should be loose, allowing the shoulder joints to move freely. |
Switch on your Edbot Mini using the slider switch at the rear of your Edbot Mini behind the shoulders. The servo motor LEDs should flash red once. If they flash red five times the batteries need to be recharged, see Charging. You should see a red light on the micro-controller indicating the power is on. Your Edbot Mini's Bluetooth module will now flash blue, indicating it is trying to make a Bluetooth connection. Make sure the Edbot Software is running and configured. Press the connect button. After a few seconds the Bluetooth module should display a steady blue light, indicating it is connected.
Your Edbot Mini is now ready to run your code!
The batteries should last for an hour or more during normal operation.
|
Switch off your Edbot Mini between active sessions. Your Edbot Mini does not have to be kept on continuously during a classroom session, when students are busy coding and not ready to send their programs to the robot. After switching on press the connect button in the Edbot Software to reconnect. Note if the servo motors are switched on they will still use power to maintain their position, even if they are not moving. |
Switch off your Edbot Mini and carefully move the servo motors so that your Edbot Mini can fit into the foam cut-out inside the Edbot Mini case. See the diagram. Gently push your Edbot Mini back into the foam cut-out making sure the servo motor cables do not snag before closing the case and storing it safely away.
Battery not charging.
If the battery is not fully charged and the charger LED does not display a red charging light:
Inspect the batteries, charging cradle and cable for damage. If damaged do not use and contact us for a replacement.
Check the batteries are fitted correctly in the cradle, lining up the metal connectors on the battery and the charging cradle contacts.
Check the charging cable is fitted correctly.
Check the USB power adapter is turned on.
Servo motor LEDs not flashing red once at start-up.
Make sure the batteries are charged. See Charging.
Check both batteries are inserted correctly in your Edbot Mini.
Servo motor LEDs flashing red five times at start-up.
The batteries are low and need to be charged. See Charging.
A servo motor LED displays a continuos red light.
This indicates the servo motor is overloaded. Switch your Edbot Mini off and wait a few minutes for it to cool then switch on again. This should clear the issue. If the problem persists report it to us.
Edbot Mini not connecting to the Edbot Software via Bluetooth.
Check the Edbot Software is running and Bluetooth connectivity is turned on.
Make sure the batteries are charged. See Charging.
Check your Edbot Mini is switched on.
Check the Bluetooth LED is flashing and your Edbot Mini is not connected to another device.
Check your Edbot Mini is within the Bluetooth transmission range of 10 metres.
|
Note it can take up to 15 seconds for your Edbot Mini to connect via Bluetooth. |
Read the following safety information carefully and get familiar with the controls and proper use of your Edbot Mini. Following these safety precautions will keep you, your students and your Edbot Mini safe.
Only use your Edbot Mini for the purpose for which it was designed, ie. teaching programming skills through robotics. Any other use can be hazardous and may damage your Edbot Mini. Examples of improper use may include but are not limited to using your Edbot Mini as a child’s toy.
|
Do not attempt repairs
Do not attempt to take apart, open, service, or modify the product or accessories. Doing so could present the risk of electric shock or other hazard. Any evidence of any attempt to open and/or modify this device, including any peeling, puncturing or removal of any labels will void the Limited Warranty. Heed all warnings and follow all instructions. |
|
Choking hazard
This device contains small parts and is not suitable for children under 3 years of age. Keep small parts away from children. |
|
Small children
This device and its accessories are not toys. Do not allow small children to play with them because they could hurt themselves or others or damage the device. Keep the device and all its parts and accessories out of the reach of small children. Not suitable for children under 8 years of age. Adult supervision required. |
|
Use near water
To reduce the risk of fire or shock, do not use this device near water and do not expose it to rain or moisture. Do not attempt to dry the device with a hair dryer or a microwave oven. |
|
Potentially explosive atmospheres
Areas with potentially explosive atmospheres are often, but not always, posted and can include fuelling areas, below deck on boats, fuel or chemical transfer storage facilities or areas where the air contains chemicals or particles, such as grain dust or metal powders. Do not switch on or use the device in such an area. |
|
Interference problems
Turn off your device in any location where posted notices instruct you to do so. In an aircraft, turn off your device whenever instructed to do so by airline staff, or prior to packing a wireless device in luggage. Please consult airline staff about using the device in flight. |
|
Avoid skin irritation
This device is made of materials commonly used in worn consumer electronic devices. However certain people may develop irritation due to allergies or sensitivities. If your skin becomes irritated, stop using the device. If symptoms are severe or persist, consult your doctor. |
|
Cable and cord safety
Arrange all cables and cords so that people and pets are not likely to trip over or accidentally pull on them as they move around or walk through the area. Do not allow children to play with cables and cords. Protect cables from being pinched or sharply bent. Do not jerk, knot, sharply bend, or otherwise abuse the cables. Do not expose the cables to sources of heat. Keep children and pets away from the cables: do not allow them to bite or chew on them. If a cable becomes damaged in any way, stop using it immediately. |
|
Parts of this device are magnetic
It may attract metallic materials. To reduce the potential risk of sparks, verify the electrical connection area is free of metallic objects before connecting devices. In order to reduce the likelihood of magnetic fields interfering with compass readings, disrupting the proper operation of pacemakers, or corrupting magnetically stored data, do not place credit cards or other magnetic storage media or magnetically sensitive devices near this device. |
|
People with photosensitive epilepsy
The device contains flashing lights that could trigger a seizure in people with photosensitive epilepsy. |
|
People with pacemakers
The device contains a Bluetooth module which is a wireless transmitter. The Health Industry Manufacturers Association in the US recommends that a minimum separation of 15cm be maintained between a wireless device and a pacemaker to avoid potential interference with the pacemaker. If you have an reason to suspect that interference is taking place, turn off the device immediately. |
|
Other medical devices
If you use any other personal medical device, consult the medical device manufacturer or your physician to determine if it is appropriate for you to use this device near your personal medical device. |
Only used the supplied batteries in your Edbot Mini.
Never use your Edbot Mini in direct sunlight or near a heat source. Excessive heat can damage the servo motors.
Never use your Edbot Mini near water. Your Edbot Mini is not waterproof.
Never use excessive force to move your Edbot Mini’s joints or limbs, this may damage the servo motors.
Never use sharp or pointed objects with your Edbot Mini.
|
Do not handle your Edbot Mini when it is in operation. It has potential finger pinch points at joints. During motions your Edbot Mini may move quickly and will not detect obstructions. Adult supervision is required. |
To carry out an emergency stop: grip your Edbot Mini by the head, this is not a moving part. Switch off your Edbot Mini using the on/off slider switch located at the back of the shoulder area. Your Edbot Mini will stop performing motions and its joints will become passive.
Always store your Edbot Mini in the case provided.
Do not store your Edbot Mini in direct sunlight or near a heat source. Excessive heat can damage your Edbot Mini.
Only use the supplied batteries in your Edbot Mini. Do not use the batteries in any other device. If the batteries are used in other devices it may damage the performance of the batteries or reduce their life expectancy. If the device causes an abnormal current flow, it may cause the batteries to become hot, explode, or ignite and cause serious injury.
The temperature range over which the batteries can be used is -10°C to 60°C. Do not use the batteries outside this temperature range.
Do not pierce the batteries with nails, strike them with a hammer or otherwise subject them to strong impacts or shocks.
Do not expose the batteries to water or allow the batteries to get wet.
Do not disassemble or modify the batteries. The batteries contains safety and protection devices which, if damaged, may cause them to generate heat, explode or ignite.
Do not use the batteries on or near fire, direct sunshine or other high-temperature locations.
Immediately discontinue use of the batteries if, while using, the batteries emit an unusual smell, feel hot, change colour, change shape, or appear abnormal in any other way. Contact Robots in Schools Ltd if any of these problems are observed.
Follow the precautions for using the batteries detailed in the section above and additionally:
Only use the supplied charger cradle to charge your Edbot Mini batteries.
The temperature range over which the batteries an be charged is 0°C to 45°C. Do not charge the batteries outside this temperature range.
Store a set of batteries in your Edbot Mini and store the spare set of batteries in the charging cradle.
If you are not planning to use the batteries for 6 months or longer, first charge them fully and then recharge them once a year. A Li-ion battery that has been left discharged for too long may no longer effectively hold charge.
Do not dispose of the batteries in household waste. Instead, it is your responsibility to hand them over to an applicable collection point for the recycling of batteries.
| Term | Definition |
|---|---|
Bluetooth |
Bluetooth is a way of exchanging data wirelessly over short distances using radio transmissions. |
Li-ion Battery |
A type of rechargeable battery which has twice the energy capacity of a Nickel-Cadmium battery and greater stability and safety. |
Robot Microcontroller |
A robot microcontroller is an entire computer integrated into a single chip which includes a processor, memory, a communications interface and programmable input and output pins to read sensors and control servo motors. It is often referred to as the 'brain' of a robot. |
Programmable Robot |
A programmable robot can be instructed to perform a sequence of steps in a repetitive manner. It can then be reprogrammed to perform a different sequence of steps. |
Python |
Python is an interpreted, cross-platform, object-oriented programming language created by Guido van Rossum in 1991. It supports modules and packages, which encourages program modularity and code reuse and its simple, easy to learn syntax emphasises readability. |
Scratch |
Scratch is a visual programming language developed by the MIT Media Lab. It can be used for a range of educational purposes from maths and science projects to animated stories with art and music. It provides a stepping stone to the more advanced world of computer programming. |
A servo motor is an actuator that allows for precise control of angular position, velocity and acceleration. It consists of a motor coupled to a sensor for position feedback and requires a relatively sophisticated controller. |
Your Edbot Mini is covered by a one-year limited warranty including parts and labour, subject to the conditions listed below.
The conditions of the warranty:
This warranty applies to defects or faults notified to Robots in Schools Ltd within one year from the date of purchase of the equipment.
This warranty covers use of your Edbot Mini for the purpose for which it was designed ie. an educational robot for teaching programming skills. Robots in Schools Ltd declines any liability for damages caused by improper use.
This warranty does not cover any faults or defects caused by failing to follow the safety information provided in this owner's manual, or any attempt to repair, modify or adjust your Edbot Mini.
This warranty does not apply to the unassembled Edbot Mini kit.
This warranty is offered as an additional benefit to your statutory rights and does not affect these rights in any way.
In the unlikely event of your equipment requiring repair, please contact Robots in Schools Ltd. You will need to provide proof of date of purchase, so please keep your invoice or receipt which is supplied at the time of purchase.
No liability can be accepted for any inaccuracies or omissions in this publication, although every possible care has been taken to make it as complete and accurate as possible.
The product has undergone testing and complies with the following standards.