
Scratch 3.0 is a visual programming language developed by the MIT Media Lab. It can be used for a range of educational purposes from maths and science projects to animated stories with art and music. It provides a stepping stone to the more advanced world of computer programming. Scratch 3.0 is an online Web app that runs in your browser.
The Edbot Software enables your Scratch 3.0 project to control your Edbot Minis by providing extra Scratch blocks in a Scratch 3.0 extension. The MIT team haven't yet announced how they plan to incorporate external Scratch 3.0 extensions into their main Web site. However they've made the source code of Scratch 3.0 available on GitHub which has allowed us to add our own extensions!
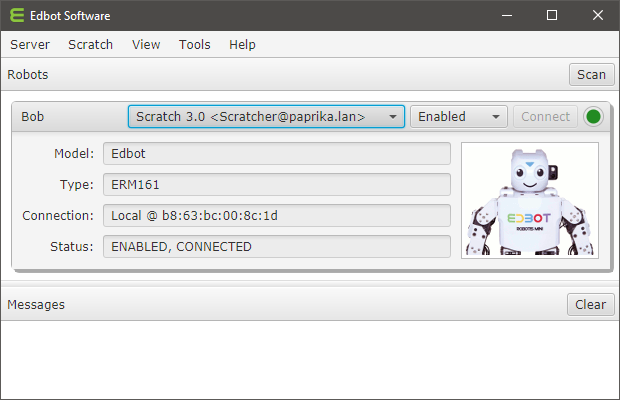
Make sure the Edbot Software is running locally on your device. Your Edbot Minis should be available in the Robots pane. It doesn't matter if they are configured locally or remotely.
Use the following link to access Scratch 3.0 with the Edbot Mini extension:
Most modern browsers should work. Add the Edbot Mini extension by clicking the extensions button in the bottom left corner and selecting the Edbot Mini extension. This will load the Edbot Mini blocks.
After loading the extension, your program will need control of the robot. Grant control using the active user menu in the Edbot Software. See below.
|
If you're developing solo, the Edbot Software provides a convenient per-robot option "Open access" in the Server → Setup → Configure window. This will allow any connection to control the robot. Check this option while developing so that you don't need to give control each time you test your program. To stop other network users inadvertently accessing the robot, uncheck the "Available on network" option. |
You can open the sample Scratch 3.0 projects too. First generate the projects by selecting Scratch → Generate Sample Projects in the Edbot Software. This will embed the Scratch 3.0 extension with your Edbot Mini names into each project. Select File → Load from your computer from the Scratch 3.0 menu and select the project you'd like to open. The Edbot Mini extension will be automatically loaded if necessary. Note all Scratch 3.0 project files have an .sb3 suffix.
Use the Scratch → Project updater in the Edbot Software to rename robots in existing Scratch projects. You may need to reload the Scratch 3.0 Web page to get the updated Edbot Mini extension.
The Edbot Mini Scratch blocks are described below in a fair amount of detail. Please take the time to read through the rest of this document to familiarise yourself, there's a lot going on! We've called our Edbot Mini 'Bob', but you'll have given yours its own cool name of course…
|
Some of the Edbot Mini Scratch blocks require you to enter a value. If you enter an invalid value, Scratch has no way of letting you know. You can check for errors by opening the Log Viewer window in the Edbot Software under Tools → Log viewer. |
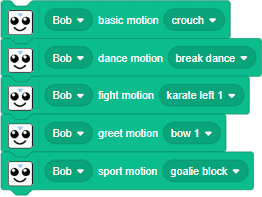
A motion is a set of movements. For example the 'walk forwards' motion instructs your Edbot Mini to walk a few steps forwards. As each servo moves, it will light up in a specific colour to add a stunning visual effect to the motion. Your Edbot Mini comes pre-loaded with lots of motions which are arranged in six categories to make things easier to find:
basic, dance, fight, greet, gym & sportYour Scratch script will wait until the motion has completed before moving on.

You can also run a motion by number, starting from 1. This is useful if you want to cycle through the available motions, for example.
|
You can use this block to issue special commands whilst a motion is running. Running motion 0 will stop the currently executing motion in its tracks. Motion -1 will instruct the current motion to run its exit unit, then stop. For more information on this advanced usage, see Motion index numbers. |

Normally your Edbot Mini will automatically light up in an aurora of colours when it is performing a motion. This is great to look at, but you may want to set the motion colours yourself. You can turn off the automatic motion lights using this block. You can then use the servo colour block (described below) to set the servo colours before you run a motion. Remember to turn them off when the motion has completed. For example, try setting all servos to green when walking forwards and red when reversing.

Give this Scratch reporter block a motion number and it will give you the motion name in return. If the motion number is unknown, empty text (zero length) will be returned.
These blocks let you control individual servos. You can turn a servo on or off, set the colour, speed and position of a servo and get its current position. All of the blocks, with the exception of servo position, offer an "all" option to address all the servos at the same time. If you need to control a set of servos simultaneously, use the multi servo blocks described below.

With all servos turned off, your Edbot Mini will be all floppy. Use this block to turn a servo on or off. Note that when you run a motion the servos will be automatically turned on and left on for subsequent instructions.

Use this block to set the colour of a servo to your chosen colour. Use the same block to turn the servo light off. You can use a number in place of a colour name here, see the list below.
0 |
Off |
- |
1 |
Red |
|
2 |
Green |
|
3 |
Yellow |
|
4 |
Blue |
|
5 |
Magenta |
|
6 |
Cyan |
|
7 |
White |

Set the servo speed for the next servo position block. This can be applied to a specific servo or all servos at the same time. The speed is a number from 1 to 100 inclusive. Setting this to 100 will effectively set the maximum servo speed which can be quite snappy, so mind those fingers!
|
This block simultaneously sets the servo torque on to work around a firmware bug. |

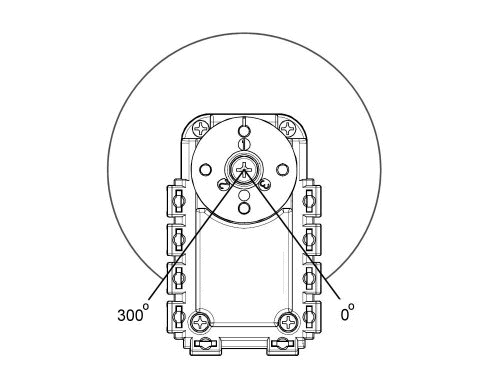
Move an individual servo to the position specified between 0 and 300
degrees. See the diagram below.
You need to be a little careful here. It's a good idea to check the current position of the servo before moving it to a new position in case you end up tying your Edbot Mini up in knots. Get the servo position from the current position block described below. If you're unsure you can do something seriously cool like this, to move servo 1 by 10 degrees:


This is a Scratch reporter block which gives you the current position of a servo. The position is an angle between 0 and 300 degrees. See the diagram above.
|
To receive servo data, you'll need to disable sensor data using the set sensors block. |

This Scratch reporter block returns the current load on a servo expressed as a percentage. When a servo is switched on you can gently apply a force to try and move it. The more force you apply, the greater the load. Check out the Scratch handshake project in the sample folder for a cool example.
|
The load is directional and ranges from -100 to +100. |
These blocks allow you to control a set of servos simultaneously.

Turn a set of servos on or off. Specify the servo by number followed by "/" followed by 0 or 1 to turn the servo off or on respectively. Specify multiple servos by repeating the sequence, for example "1/0/2/0/3/1/4/1". Servo number 0 means all servos, so "0/0" will turn all servos off.

Set the colours of a set of servos. Specify the servo number followed by "/" followed by the servo colour index as defined in the colour table. Specify multiple servos by repeating the sequence, for example "1/3/2/3/3/3/4/3". Servo number 0 means all servos, so "0/3" will set all servos to colour index 3.

Set the speed of a set of servos. Specify the servo number followed by "/" followed by the speed expressed as a percentage greater than zero. Specify multiple servos by repeating the sequence, for example "1/50/2/50/3/50/4/50". Servo number 0 means all servos, so "0/12.5" will set all servos to one eighth speed.
|
This block simultaneously sets each servo torque on to work around a firmware bug. |

Set the position of a set of servos. Specify the servo number followed by "/" followed by the position which is an angle from 0 to 300 degrees, see the servo diagram. Specify multiple servos by repeating the sequence, for example "1/250/2/50".

This is a Scratch reporter block which gives you the current position of each servo. Useful for more advanced scripting.
|
To receive servo data, you'll need to disable sensor data using the set sensors block. |

By default your Edbot Mini continuously sends sensor data to the Edbot Software. To get servo data, for example if you're doing motion capture, you'll need to turn off the sensors using this block.
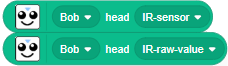
This reporter block returns the current value of the head IR sensor. The IR sensor is mounted on the Edbot Mini's head and measures the distance to an object in front of the Edbot Mini. The sensor was calibrated using the distance between the front edge of the feet and a vertical white A4 card. Note the sensor may give different measurements for different coloured objects placed the same distance away. The reading should be interpreted as an approximate distance in centimetres. The measuring range is 3cm to 30cm rounded to 1 decimal place. A value of 100.0cm means "out of range". In addition you can use the raw value returned from the sensor.
Edbot Mini has 4 sensor ports (1 - 4) with port-1 used for the head IR sensor. It is possible to add other sensors and this next block can be used with a DMS-80 sensor plugged in to port-2 and attached to the chest plate. This IR sensor uses triangulation to provide an accurate distance reading over a longer range.
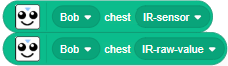
The reporter block returns the current value of the chest IR sensor. The IR sensor is mounted on the Edbot Mini's chest and measures the distance to an object in front of the Edbot Mini. The sensor was calibrated using the distance between the front edge of the feet and a vertical white A4 card. Note the sensor may give different measurements for different coloured objects placed the same distance away. The reading should be interpreted as an approximate distance in centimetres. The measuring range is 8cm to 80cm rounded to 1 decimal place. A value of 100.0cm means "out of range". In addition you can use the raw value returned from the sensor.
The following blocks instruct your Edbot Mini to speak! The voice, language, volume, pitch and speed will have been set up during configuration.
| Try configuring your Edbot Mini with a different language, if you have the voices available. You can then type text in your chosen language in the speech blocks! |

Say the words! This block won't wait for the speech to finish before continuing to the next block.

Say the words! This block will wait for the speech to finish before continuing to the next block.

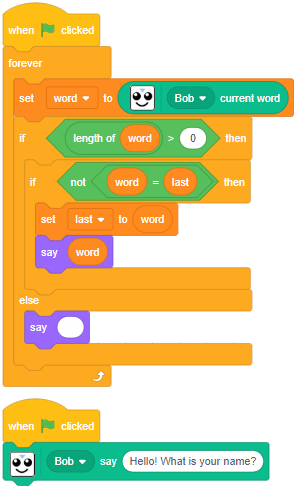
This reporter block gives you the current word as it is being spoken. It returns empty text (zero length) if your Edbot Mini isn't speaking. Use it to add visual emphasis during speech, such as flashing your Edbot Mini's servo lights on and off. The example below displays the current word in a speech bubble.

This will stop the current command, turn all the servo lights off, set the motion lights / sensor to defaults and halt any speech on a word boundary. It won't turn the servos off however, just in case your Edbot Mini is in the middle of an amazing acrobatic routine.
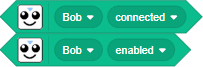
This reporter block can be used to check if your Edbot Mini is connected to the Edbot Software and whether it is enabled or not. The block returns true if connected or enabled and false if not.